I always wonder what is my computer doing when it takes long time to shut down? Incidentally I found a brief good explanation on reddit.
Just in case you're too lazy to click the link, I copied down the answer here:
The computer does many things when you shut down. This post is going to cover as many as I can think of.
One of the simplest and most important has to do with memory. The computer has to insure that anything that needs to be written to disk, is written to disk. If you don't do this, you could end up with corrupt or invalid files. If you want more detail than that, you're going to have to take a few years of computer science at a college level. Read More...
Generally, we are only able to run bootable CD or DVD from its original media. You cannot just copy the installation files to USB flash drive and run them from the USB drive since bootable CD or live CD contains additional boot loader, different from non bootable CD. Then, here is a program that will let you copy bootable CD and DVD to USB flash drive, USB stick, HDD etc. It means, you can install Windows from the portable media to your computer or netbook. Of course it will certainly facilitate the installation process to netbook since most of netbook not equipped with optical drive. Read More...
Yesterday we talked about preparation before reinstalling OS, now I'm gonna write things to do first after you finish reinstall Windows. Of course there are some things to do after Windows reinstallation in order that your PC ready to use.
1. Install devices driver
Device driver is a program that allows a specific device, such as a modem, network adapter, or printer, to communicate with the operating system. Although a device might be installed on your system, Windows cannot use the device until you have installed and configured the appropriate driver.
If a device is listed in the Hardware Compatibility List (HCL), a driver is usually included with Windows. Device drivers load automatically (for all enabled devices) when a computer is started, and thereafter run invisibly.
Read also for more information about installing devices driver.
2. Setup network and internet connection
To setup network and internet connection, go to Start > All Programs > Accessories > Connection > Network Setup Wizard or New Connection Wizard. If you don't a network or internet connection, pass this step and go to next step. I place setup network and internet connection on second place regarding you may want to download newest devices driver and typically you'll need it to update your antivirus definition which we will install it on the third step of this list.
3. Install antivirus and update it
Now you have all driver installed and your network or internet connected. Your computer now should run properly. But without antivirus your computer is vulnerable to virus attack and other malicious software.
Nowadays, there are a lot of antivirus either free or paid antivirus. For free antivirus, you can choose Avira Antivir, AVG Antivirus or other free antivirus. For paid antivirus there are many choices; Norton Antivirus, McAfee, NOD32, Kaspersky, Panda Antivirus etc. The free antivirus not always worse than the paid one. There are many case that the free antivirus works better than paid antivirus. The key is you have to update the antivirus regularly whether it is free or not. FYI, most antivirus need internet connection to update their database, some could be updated manually. Read also the post on how to manual update NOD32 antivirus.
4. Install applications
It is time to install applications. I suggest you to install 'big application' beforehand. Big application means application which the installer has more than 100 mb in size. IMHO, you have to install this first because big application has more complicated configuration and files and a lot of registry entry. So the principle is big first, small later.
5. Restore applications' configuration backup
After installed, for your frequently used application, you sometimes have to customize it to adjust as you need. Than reconfigure one by one, you can restore applications settings from back-up previously made. For MS Office, go to Start > All Programs > Microsoft Office > Microsoft Office Tools > Microsoft Office Save My Settings Wizard. Choose to restore configuration and follow next instruction in the wizard.
6. Tweaking to boost computer performance
Read how to boost your computer performance in the next post.
That's all things to do after Windows setup. Want to add? Read More...
Installing a new device, whether it's Plug and Play or non-Plug and Play, typically involves up to three steps:
Connecting to your computer.
Loading the appropriate device drivers. If your device is Plug and Play, this step may not be necessary.
Configuring device properties and settings. If your device is Plug and Play, this step may not be necessary.
Whether your device is Plug and Play or non-Plug and Play, you should follow the device manufacturer's installation instructions to ensure that it functions properly. This may require you to shut down and unplug your computer, and then connect the device to the appropriate port or insert it into the appropriate slot.
If the device does not automatically work, it is non-Plug and Play, or it is a necessary startup device like the hard disk, you may have to restart your computer. Windows then attempts to detect your new device.
If Windows does not successfully find your new hardware, you must use the Add Hardware Wizard in Control Panel to tell Windows what type of device you are installing. The Add Hardware Wizard may ask you to insert media (such as a compact disc or floppy disk) if any were provided with the device. The Add Hardware Wizard is primarily used for installing non-Plug and Play devices.
After Windows detects the device, or you identify the device using the Add Hardware Wizard, Windows tries to find and install the correct driver for the device.
First, Windows searches for the driver on your computer's hard disk and on the device manufacturer's floppy disk or compact disc, if one is inserted into a disk drive. If the driver is found in either of these places, Windows installs it.
If Windows doesn't find a driver, and your computer is connected to the Internet, Windows searches for one on the Microsoft Web site. For the latest updates, including security fixes, service packs, new Help files, and device drivers, see Windows Update in Help and Support Center. If the driver is found on the Windows Update site, Windows copies and installs it onto your computer. If your computer is not connected to the Internet, Windows displays a message prompting you to connect to the Internet.
If Windows cannot find the driver on the Windows Update site, the Found New Hardware Wizard will be displayed and will prompt you to insert any media (such as compact discs or floppy disks) that were provided with the device. If the driver is located there, Windows installs it onto your computer.
Desktop is the display that you see first after logon into a computer to start a job. Desktop wallpaper is one of important part that may influence your mood and affect on the result of your work. An amazing wallpaper picture will not amaze you anymore when you see it everyday for a long time, even that could bring you bored, isn’t it?
Wallpaper Shifter is program to automate wallpaper shifting every time you turn on computer and randomize wallpaper cycling in a defined folder. Usually, to make a picture as desktop background or wallpaper it has to be fit with display aspect ratio, but Cyber-D’s Wallpaper Shifter will handle all images with any aspect ratio image. So if the wallpaper picture doesn’t fit to desktop, Wallpaper Shifter will automatically crop, fit or center wallpaper images. You can also choose background for unfitted picture by default, blur of edge repeat effect. Wallpaper Shifter doesn’t consume a lot of computer resource since it only work once every computer starts.
Q-Dir is a file and folder explorer like Windows Explorer or Dual Explorer with many additional features and also, portable. These are features of Q-Dir:
Quadro view; allow you to open until 4 windows content 4 different location at the same time.
I-net search; displays summarize of a file like image dimension, file format, MP3 bitrate, file size, etc.
Screen magnifier; zoom into hovered area.
Quick Links; Jump to a specified location or open it in different windows.
Filter; select or highlight specified files by extensions.
Different filename and attributes color by extensions.
Easy drag and drop files and folders from one window to another.
You can install and runt it from removable media.
With Q-Dir you even able to save windows position and folder location for future uses!
Cons: No built-in file finder.
Download this file and folder manager here (191 kb is too small, isn’t it?)
Read More...
In the implementation, Vista serves huge feature by default. One of them is Transient Multimon Manager (TMM). Made for user who works with multidisplay by external monitor for mobile PC and external monitor for PC desktop. And of course, TMM consumes some resources. If you feel this feature is useless, you can disable it.
Click Start - Control Panel
Double click on Administrative Tools. If you can't find it, try to switch the Control Panel Classic on the left pane.
Go to Computer Management
Go to Task Scheduler - Task Scheduler Library - Microsoft - Windows - MobilePC
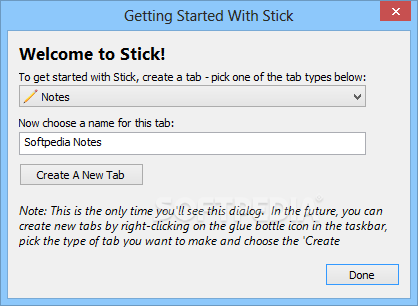
Do you often work with web browser, calendar, notepad and calculator? If you answer yes, so you’ll need this application. It called Stick. Stick collects web browser, explorer, taskbar, RSS reader, notepad, calculator and calendar into one application. All of those programs will displayed in their own tab on the desktop. It could be rather hard to be imagined, so you have to try it to understand.
If your PC currently running on Vista, and occasionally use XP frequently, so you need a shortcut to save your time. Of course, this tips only work on dual boot PC, Vista and XP.
Next, we’ll make a shortcut to restart computer (when you run on Vista), and automatically change to XP.
Open Notepad
Type this command to notepad: bcdedit /bootsequence {ntldr} /addfirst shutdown /r /t 0
Save as batch file, go to File – Save As, name it “Reboot into XP.bat”
To get easier access, you may give a desktop shortcut to the file or directly save it on the desktop.
That’s all, now when you are running Vista and need to move to XP quickly, double click the shortcut.
To make a reboot/restart shortcut in XP to XP:
Right click on the desktop - New - Shortcut
After create shortcut window appear, type this: Shutdown -r -t 0
Give the shortcut a name
Change the icon if you like to
Try double click your new shortcut to reboot
You can modify shutdown command parameters by:
Press Win + R to activa Run box
Type 'cmd' (without quation), enter
Type 'shutdown /?', enter
It should show the usage of shutdown command and parameters.
Using Vista, do you feel something dragging on your internet connection? There's an easy way to check it without downloading any network monitoring software. Point to Control Panel | Administrative Tools, then click on the Reliability and Performance Monitor (or just search for the monitor from the Start menu). It will display Vista's Reliability and Performance Monitor. The monitor shows graphs of used resources on your pc i.e. CPU, disk, network and memory. Click the Network tab of Vista's Reliability and Performance Monitor. It displays every application tapping your connection, what application is using your connection as well as how many bytes per minute each sends and receives. If you you find some process (you don't need) consumes ur internet resources, close the application from Task Manager.
With windows Vista you have noticed the slow internet speed. The web browsing and downloading speed is very slow as compare to previous versions of windows. You can open the same sites in windows XP and server 2003 with the normal speed.
Follow the given steps to increase the Vista browsing speed:
First go to Advance tab in Internet Explorer and turn off the TLS (Transport Layer Security) encryption option. Here to fix problem with some secure pages turn on the SSL 2.0 (Secure Sockets Layer) feature and click Ok button to close it.
Follow the major fix for this problem:
In windows Vista, the TCP autotuning feature is enabled by default. Some web servers do not respond properly to this feature, so it appears that some sites open with very slow speed.
To use this feature, you will need to be logged into your computer with administrative rights.
First click on Start button and type CMD in Run option then press Enter.
At Command Prompt, type the following command and press enter.
netsh interface tcp set global autotuninglevel= disabled
This command will disable the TCP autotuning feature. Now close the command Prompt and restart your computer after any changes to go into effect.
You can easily restore these setting by typing the following command at Command Prompt.
netsh interface tcp set global autotuninglevel= normal
Now close the command Prompt and again restart your computer after any changes to go into effect.
Type shutdown.exe -s -t sss then press the OK button.
Here sss means time in seconds, for example, if you want your computer automatically stops within 10 minute then the command will be shutdown.exe -s -t 600.
After the execution, you can cancel this order at any time, simple type shutdown.exe -a in a Run box and press OK. Your command automatic shutdown will remove and your computer will continue working.
Windows XP monitors the files that are used when the computer starts and when you launch applications. By monitoring these files, Windows XP can prefetch. The prefetching data is the process by which data should be requested is read ahead in the cache. Prefetching boot files and applications reduces the time needed to boot Windows XP and start applications.
Although Microsoft has released Vista to replace XP, 92,01% of visitors to this blog still using XP! No doubt, XP is still the most popular OS now. As an XP user, you may still don't know some usefull utilities inside your OS. Hidden Utilities XP allows access to nearly 100 hidden utilities that are not normally accessible to the average user. System information, diagnostics, repair tools and more in both Windows and Command Line utilities are now easily opened. Hidden Utilities XP includes easy access to 53 Windows tools and 43 Command Line utilities.
Metapad is a small, fast (and completely free) text editor for Windows 9x/NT/XP with similar features to Microsoft Notepad but with many extra (and rather useful) features. It was designed to completely replace Notepad since it includes all of Notepad's features and much, much more.
I used this function: Select B1, type the formula below =IF(VALUE(RIGHT(A1,2))>=50,CEILING(A1,100), FLOOR(A1, 100))
PS: I was using MS Excel 2007, may there are little differences with another version. You may change the number of significance (100) to 10, 50, 25 etc.
Dual Xplorer is similar with Windows Explorer with two panel window / dual explorer. It is easier for copying files by drag n drop. That's not all, Dual Xplorer also armed with network tools such as Map network drive, Ping, Trace route etc. Included also tools: Create link, Hexa editor, Base converter, Cookie viewer, BIOS info, Windows CD key, Registry monitor, Process viewer and much more. Be sure you'll have one! or regret it in the rest of your life...
Tarylynn synchronises two folders and all subfolders within. Good for a quick backup to a network drive, or copying files to a laptop. No need to spend time trying to setup a windows briefcase. Because Tarylynn does not depend on a database like briefcase does, backups are more portable, and there is no single point of failure.
If files exist on both sides, the file modified dates are compared and the newer one is copied across. When deleting, files existing on both sides are ignored regardless of modified dates.
Tarylynn can even be scripted for automatic running. Useful for periodic backups, or for copying default user settings for software installation.
Tarylynn also comes with a simple FTP mode. Great for updating webpages or accessing work servers when at home.